| Introduction Site Map Main Project Email: jja@nac.net |
— Stanislaw Lem, Solaris


Monday, February 21st, 2005
Update tonight...
Update: In October of last year, I reached a halfway point in a piece of Something Positive fan art. I'm now ready to continue the piece by coloring it, smoothing out the lines and correcting errors.
(One large error I have to fix here is that the device in the background is properly called the WABAC machine, not Wayback. Thanks to Laura for spotting this.)
To color the image, I had several options:- Color the original pencil sketch and rescan. I rejected this for several reasons; chiefly that I want to maintain the look and feel of Something Positive with this piece. SP's color is applied in the computer and is smooth, bright and homogenous. I would have a hard time matching colors and an impossible time trying to keep an even intensity, considering my level of inexperience in coloring with traditional media.
- Use Photoshop to fill in areas with color. Many professional comics colorists use Photoshop for this purpose,
as does Randy Milholland, creator of SP. There's an involved technical reason why I decided against it in this case...
The main cause of the problem is that I drew my images in pencil and did not ink them, so the lines are not uniformly dark and sharp in Photoshop. I can pull some tricks to darken them so they look inked, and this is the method I've used with most of my sketched artwork on this site, but this method won't work well for a piece that has to be colored.
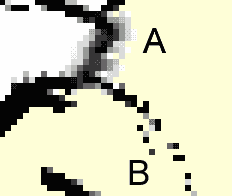 Why not? Take Photoshop's fill tool (which functions like pouring paint into a clearly circumscribed area) I applied a fill
color at point A. You can see how
the line just to the left of A has a whitish halo around it, since the fill color has only filled in pure white areas,
not the very light shades of grey which constitute the edges of the line. Also, at B, the line itself is incomplete,
and the color has spilled into a separate region which is supposed to be another color entirely...
Why not? Take Photoshop's fill tool (which functions like pouring paint into a clearly circumscribed area) I applied a fill
color at point A. You can see how
the line just to the left of A has a whitish halo around it, since the fill color has only filled in pure white areas,
not the very light shades of grey which constitute the edges of the line. Also, at B, the line itself is incomplete,
and the color has spilled into a separate region which is supposed to be another color entirely...
Other Photoshop tools can overlay colors, so that the whites and grays would be turned into shades of the appropriate hue, but I would have to 'paint' all the white line edges, so doing it this way would be about as much work as redrawing all the lines so they're dark...
Now, the pros make bold, clear lines from the start, or draw such lines in later. But instead of using imprecise fills or overlay brushes, they create separate transparent layers, with the line art on the top, and paint colored shapes beneath, similar to traditional animation techniques where the character is outlined in black on one side of the acetate, and the color is applied to the other side. The black lines hide any imprecision in the edges of the colored areas.
This still doesn't work for my pencil art, because of the white halo problem. It seems that there's no way around it; I have to redraw the lines to make this all work. And if I have to redraw the lines anyway, I'd like to do so in as flexible a way as possible, with a tool that I've mastered... And that brings us to the next option: - Bring the images into a vector-based drawing program, such as Adobe Illustrator, and trace/color there. This is the option I've chosen, and I'll explain why in the next entry. I'll also show my progress in coloring the image in the next entry and/or the following entry.
Until!
pageatatime.com is hosted by net access corporation - www.nac.net