| Introduction Site Map Main Project Email: jja@nac.net |
— Stanislaw Lem, Solaris


Thursday, December 2nd, 2004
I've been discussing the meaning of last entry's image with friends... All of it is personal info, so I'm considering how much of it I want to talk about online. I expect to have figured this out Friday evening, at which time I will update this entry.
Update:
I'd been sick on and off during the previous week (in a cycle of "Oh, I feel okay this morning, I'll go into work anyway" and then you weren't really better and you wind up sick again). This made Monday's entry late and has delayed this one as well. I'm going to talk about scratchboard in this entry, and discuss the personal aspects of the art in next Monday's entry.
A scratchboard is a piece of scratch-resistant material, usually white, covered by a kind of dried ink, usually black. You scratch the ink off using a sharp tool or stylus. It permits an inversion from standard drawing, assuming you're trying to achieve standard tonal values of white=highlight and black=shadow. Where you apply your tool, it produces background rather than foreground, and you use regular ink (blackout?). The results can be made to resemble woodcut illustrations.
The scratchboard tools I use are the same dental tools I use for sculpture, with the addition of an X-acto knife with a #11 blade. When I began the drawing, I found that some tools weren't making much of a mark; I think the scratchboard was old and the ink was less supple. This accounts for some of the awkwardness of line at the center of the drawing and some of the 'feathering' of certain lines, which, while sometimes a useful effect, was not intended here.
The abstract right side went quickly (about 15-20 minutes); achieving the realism of the left side took over an hour. I worked by eye with the faces at top center (my biological mother and father in their youth) as it was small; with the larger self-portrait I felt some extra guidance would be necessary.
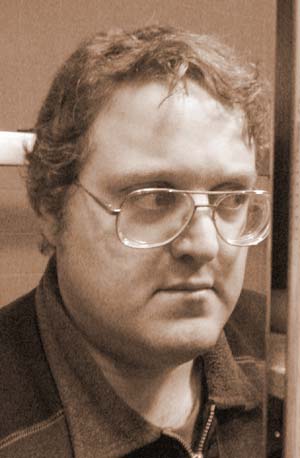
I took the above picture of myself in the bathroom mirror (the image is thereby the reverse of my actual visage, but that didn't matter in this case). I printed it at the size I wanted, and impressed the outlines onto the scratchboard with a blunt point. I then rendered the full face by eye, using the print as a reference. I first 'hashed out' areas of light and shadow, using thick lines for highlights and thin for dark. I then selected a highlight point (the forehead), made that fully white, and adjusted the tones on the rest of the face by crosshatching until it looked good.
That's all for now. More on the symbolism next time...
pageatatime.com is hosted by net access corporation - www.nac.net